-
Install our app
Downloading and installing our app on LG webOS TVs requires a few additional steps. Go to the setup steps.
Stuff you should know
LG has three lines of products running on webOS: Signage, Consumer, and Hospitality. Our software works only on webOS 6.0 Signage series devices, as the APIs on the other lines are not compatible with our software (devices labeled as Signage with Essentials don’t have the necessary functionality to run our software). The following series are supported:
UL3J series, TNF Touchscreen TV, UH5J series, UH7J series, UH5N series and UM5N series.
LG has a commercial TV series dedicated to digital signage. These webOS TVs have a built-in player (hardware running your content), so you don’t need a separate device. The operating system ensures that our app is always launched at system startup and keeps it running. Thanks to partner-level integration, our app can control the TV and its functions. For example, you can turn the TV panel on or off at scheduled times to save power and extend the LCD lifespan. As the TVs have HDMI input ports, you can use the Video Input plugin to show content such as live TV from a TV box.
Compatible LG TVs
LG has three lines of products running on webOS: Signage, Consumer, and Hospitality. Our software works only on webOS 6.0 Signage series devices, as the APIs on the other lines are not compatible with our software (devices labeled as “Signage with Essentials” don’t have the necessary functionality to run our software).
UL3J series (300 nit brightness 16/7)
- 43UL3J-N,
- 50UL3J-N,
- 55UL3J-N,
- 86UL3J-N
Touchscreen TV’s
- 27TNF3K,
- 32TNF5J,
- 43TNF5J,
- 55TNF5J
UH5J series (500nit brightness 24/7)
UH7J series (700nit brightness 24/7)
UH5N series (500 nit brightness 24/7)
UM5N series (500 nit brightness 24/7)
- 43UM5N-H,
- 49UM5N-H,
- 55UM5N-H,
- 65UM5N-H
Setup Steps
Get your TV ready
There are a couple of things you need to do before you can install our app.
Connect to wifi or wired internet -> Click settings (gear icon) -> General -> Time and Date (check that the time is correct) -> Click settings -> General -> Power -> No IR Power Off (4 hours) -> Make sure the option is turned OFF.
Step 1
Press the Settings button on the TV (Gear icon).
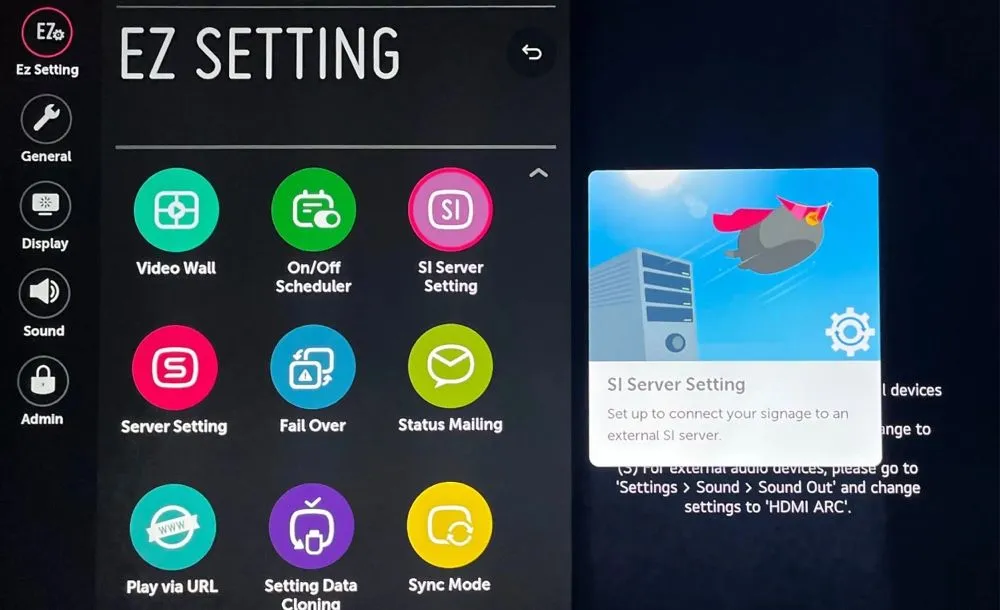
Under Ez Setting navigate to SI Server Setting
Step 2
Set the following values: Fully Qualified Domain Name: on -> Enter the following URL into the field: https://lg.playsignage.com/app.ipk -> Secure connection: https:// -> Application Launch Mode: Local -> Application Type: IPK
Step 3
Local Application Upgrade -> click REMOTE (EXTERNAL on some models) and then CONFIRM.
The TV will now download our app, and after a moment you will see the message Complete. Press OK and turn off the TV.
Step 4
Turn on the TV again and after about 30 seconds you will see a message in the top-right corner: Start to upgrade application.
Step 5
After the application has been installed, the TV will show the message Complete and our app will be launched.
Configuration from USB
You can save yourself the trouble of typing in the address by loading the configuration from a USB memory stick.
- Format a USB memory stick in FAT32
- Download the .json configuration from here.
- Copy the scap_installation.json file to the USB memory stick (the file has to be in the root folder)
- Click the settings button (gear icon) -> EZ Setting -> SI Server Settings
- Navigate down to “Auto Set”, turn this option ON, and ensure the Storage Device is selected
- Turn the TV off
- Turn the TV on
- Navigate again to SI Server Settings, and now all the fields are filled out
- Go to “Local Application Upgrade”, click the button titled “Remote” -> Confirm
- When the TV says that the upgrade is complete, click OK and turn the TV off
- Turn the TV on
- In about 30 seconds, the TV will install and launch our app
Advantages & limitations
Advantages
- The LCD panels in Signage series devices are more durable and rated for longer working hours
- Decent player performance
- The system always makes sure that the Play Digital Signage app is running
- Ability to turn the TV panel ON / OFF on a schedule (the computer part of the TV stays on)
- Support for the Video Input plugin without extra hardware: just plug the signal into the HDMI1 port
Limitations
- More expensive than a consumer series TV + Android player
- Does not support website scripting
- Does not support the website plugin UserAgent overriding
- Built-in storage is a couple of gigabytes. If you plan to have many videos, you may need to expand storage with a USB thumb drive (see FAQ)
Options & FAQ
Options can be accessed directly on the TV by using OPTIONS.
Options
Options can be accessed directly by the player or in settings for your player.
- Optimize for touchscreen – Toggle this ON if you are planning on using our app on a touchscreen. This setting will make small adjustments to how our app works in conjunction with a touchscreen.
- Analytics – Toggle this ON if you need analytic data from this particular player. Read more about Analytics
- Display Orientation – Change orientation to 90 or 270 degrees for portrait mode.
- Reload player every day at – It is good practice to clear the cache on the player once every 24 hours. Here you can set a convenient time, for example, at night when no one is watching your TV.
- Display on / off – Turn the display on and off based on a schedule. (Read how to schedule the display)
- Tags – If you are using tags, they are listed here. You can also find and add a tag.
- Re-download assets – Ask the media player to download all assets.
- Reboot – Reboot the TV remotely.
- Transfer Screen - Move screens between teams without deleting or relinking them. Learn more about Transfer Screen
- Screen Name, Screen UID, Resolution, Platform, RAM, Navigator Platform, Last IP Address, Model, and Linked ON are all information we might need if you’re having a problem with your media player or smart TV.
- Player time now – The device time tells you the player’s time and date. If the device time is wrong, it will also be wrong in our app and thus all time-related scheduling will be off, so make sure to correct the time on the player operating system if you are having problems.
- Disc Usage – Disc usage will tell you how much data has been used on the player’s storage. We recommend using no more than 80% of the storage.
- Screen edges – In case you have an LED screen, video wall, or an older model TV, you might have to adjust the edges so that they match your TV and the content.
- Remove – If you need to unlink your player or link it to another account, you can use Remove.
FAQ
I am Unable to connect to the server
Make sure that the device time is correct and that it’s connected to the internet.
I got my screen linked. What’s next?
We recommend checking out our Getting Started video.
My device says it’s offline
If the device is offline, it means the device is not connected to the internet and therefore cannot connect to our digital signage cloud. See our Offline guide.
Why is my 4 K TV running at 1920×1080?
LG 4K devices run apps in full-HD resolution (1920×1080), but their video player is capable of 4K playback, which means the 4K videos you add to your playlist will be played in 4K resolution. This is how the TV’s architecture is set up, and we cannot run our app (or any other third-party app) in 4K.
My HDMI input plugin is not showing.
If you want to show an HDMI input inside our software, make sure that the device is plugged into the HDMI1 port of the TV.
Why aren’t the home/consumer LG TVs supported?
The main reason is that the regular LG TVs don’t support auto-starting an application and recovering from a crash. Both features are essential for running digital signage content on the screen uninterrupted.
How to expand the storage?
The devices don’t have a lot of internal storage built in. If you find that your content exceeds the available storage size, you can expand the storage with a USB memory stick. Format the USB stick in FAT32 format and plug it into the TV.
Using the remote, press the up arrow, and a menu bar appears. Navigate to the Options menu. At the bottom of the menu, you can see that Internal is the currently selected option, next to a button titled “usb:1” (you only see this option if the USB stick is plugged in). Select the USB button and click it. The app will now download files to the USB storage and resume playback.
Can I turn the display on and off?
Yes. See our guide Turn your TV on and off.